Table of Content
In order to that, you’ll need to download the Arduino Bluetooth Controller app on your Android device. When the relay is off, the COM terminal is connected to the NC terminal, which means if you connect the bulb to the NC terminal, it will turn ON even when the relay isn’t energized. The relay module we’re using can handle up to 10 amps of current at up to 240V AC. Once you have connected the HC-05 module to the Arduino, you can power the Arduino with a 12V DC supply or USB cable. This crude solution should never be used with a high-speed signal because the resistors form a low-pass RC filter with any parasitic capacitance on the connection.
This Module is a quick introduction to the ESP32 and ESP8266 boards. We’ll take a quick look at its features, specifications, and pinout. We’ll also show you how to program your boards using Arduino IDE.
About this project
We provide instructions for installing Node‑RED, InfluxDB, and Mosquitto broker on Digital Ocean . Node-RED can send the sensor readings and any other data to InfluxDB . You can learn from experts, build working projects, showcase skills to the world and grab the best jobs. James has a BSc in Artificial Intelligence and is CompTIA A+ and Network+ certified. When he's not busy as Hardware Reviews Editor, he enjoys LEGO, VR, and board games. Before joining MakeUseOf, he was a lighting technician, English teacher, and data center engineer.
Node-RED allows you to create awesome automation flows without having to write code. So, it is super accessible, specially for those not much keen on writing code. In this Module, you’ll learn how to automatically set all GPIOs to a defined state using master switches and modes. You’ll also learn how to trigger events when something happens (a notification, a threshold value, etc.) Finally, you’ll learn how to set timers and schedule events.
Uploading the Code
With his system you can monitor for water leaks, see if the garage door is open, check for new mail, watch for movement, sense for gas, and even see how the dog is doing. The system uses both an Arduino and a Raspberry Pi alongside a ton of various sensors to monitor the house. You can set up the system to send you alerts when something happens or just monitor everything from your phone. Blynk is a platform with iOS and Android apps that allows you to control your Arduino, Raspberry Pi, or ESP8266 from your mobile phone.
Node-RED runs on the web browser and uses visual programming that allows you to connect code blocks, known as nodes, together to perform a task. With Node-RED you can spend more time making cool stuff, rather than spending countless hours writing code. Home automation is a term used to describe the process of automating certain tasks and devices around the home.
Checking if the site connection is secure
It’s fairly easy to replicate and requires only a handful of components. Arduino community member Roboro built this project where he connected a stationary bike to an Arduino Nano, allowing him to control the streaming of Netflix on a PC. While we used a single relay in this example, you can easily expand your system by using a multi-channel relay module.
The end result was a fully functional pinball machine controlled by a single Arduino Mega 2560. It cost significantly less than a new or even slightly used machine and is every bit as entertaining and fun. Desai’s project works by using a Bluetooth-controlled voice TV remote with an IR transmitter. An app called BT voice control converts voice input to string and sends it to Arduino to make your command a reality.
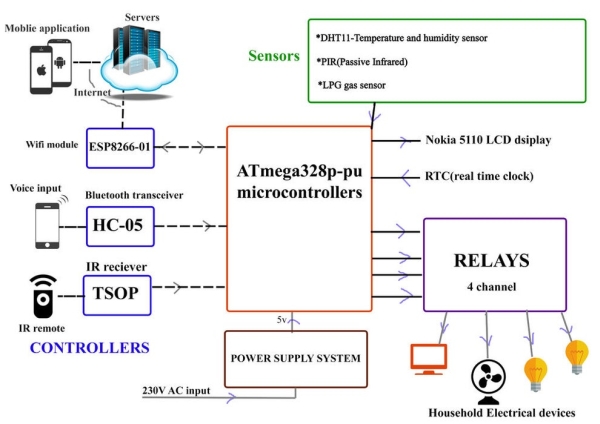
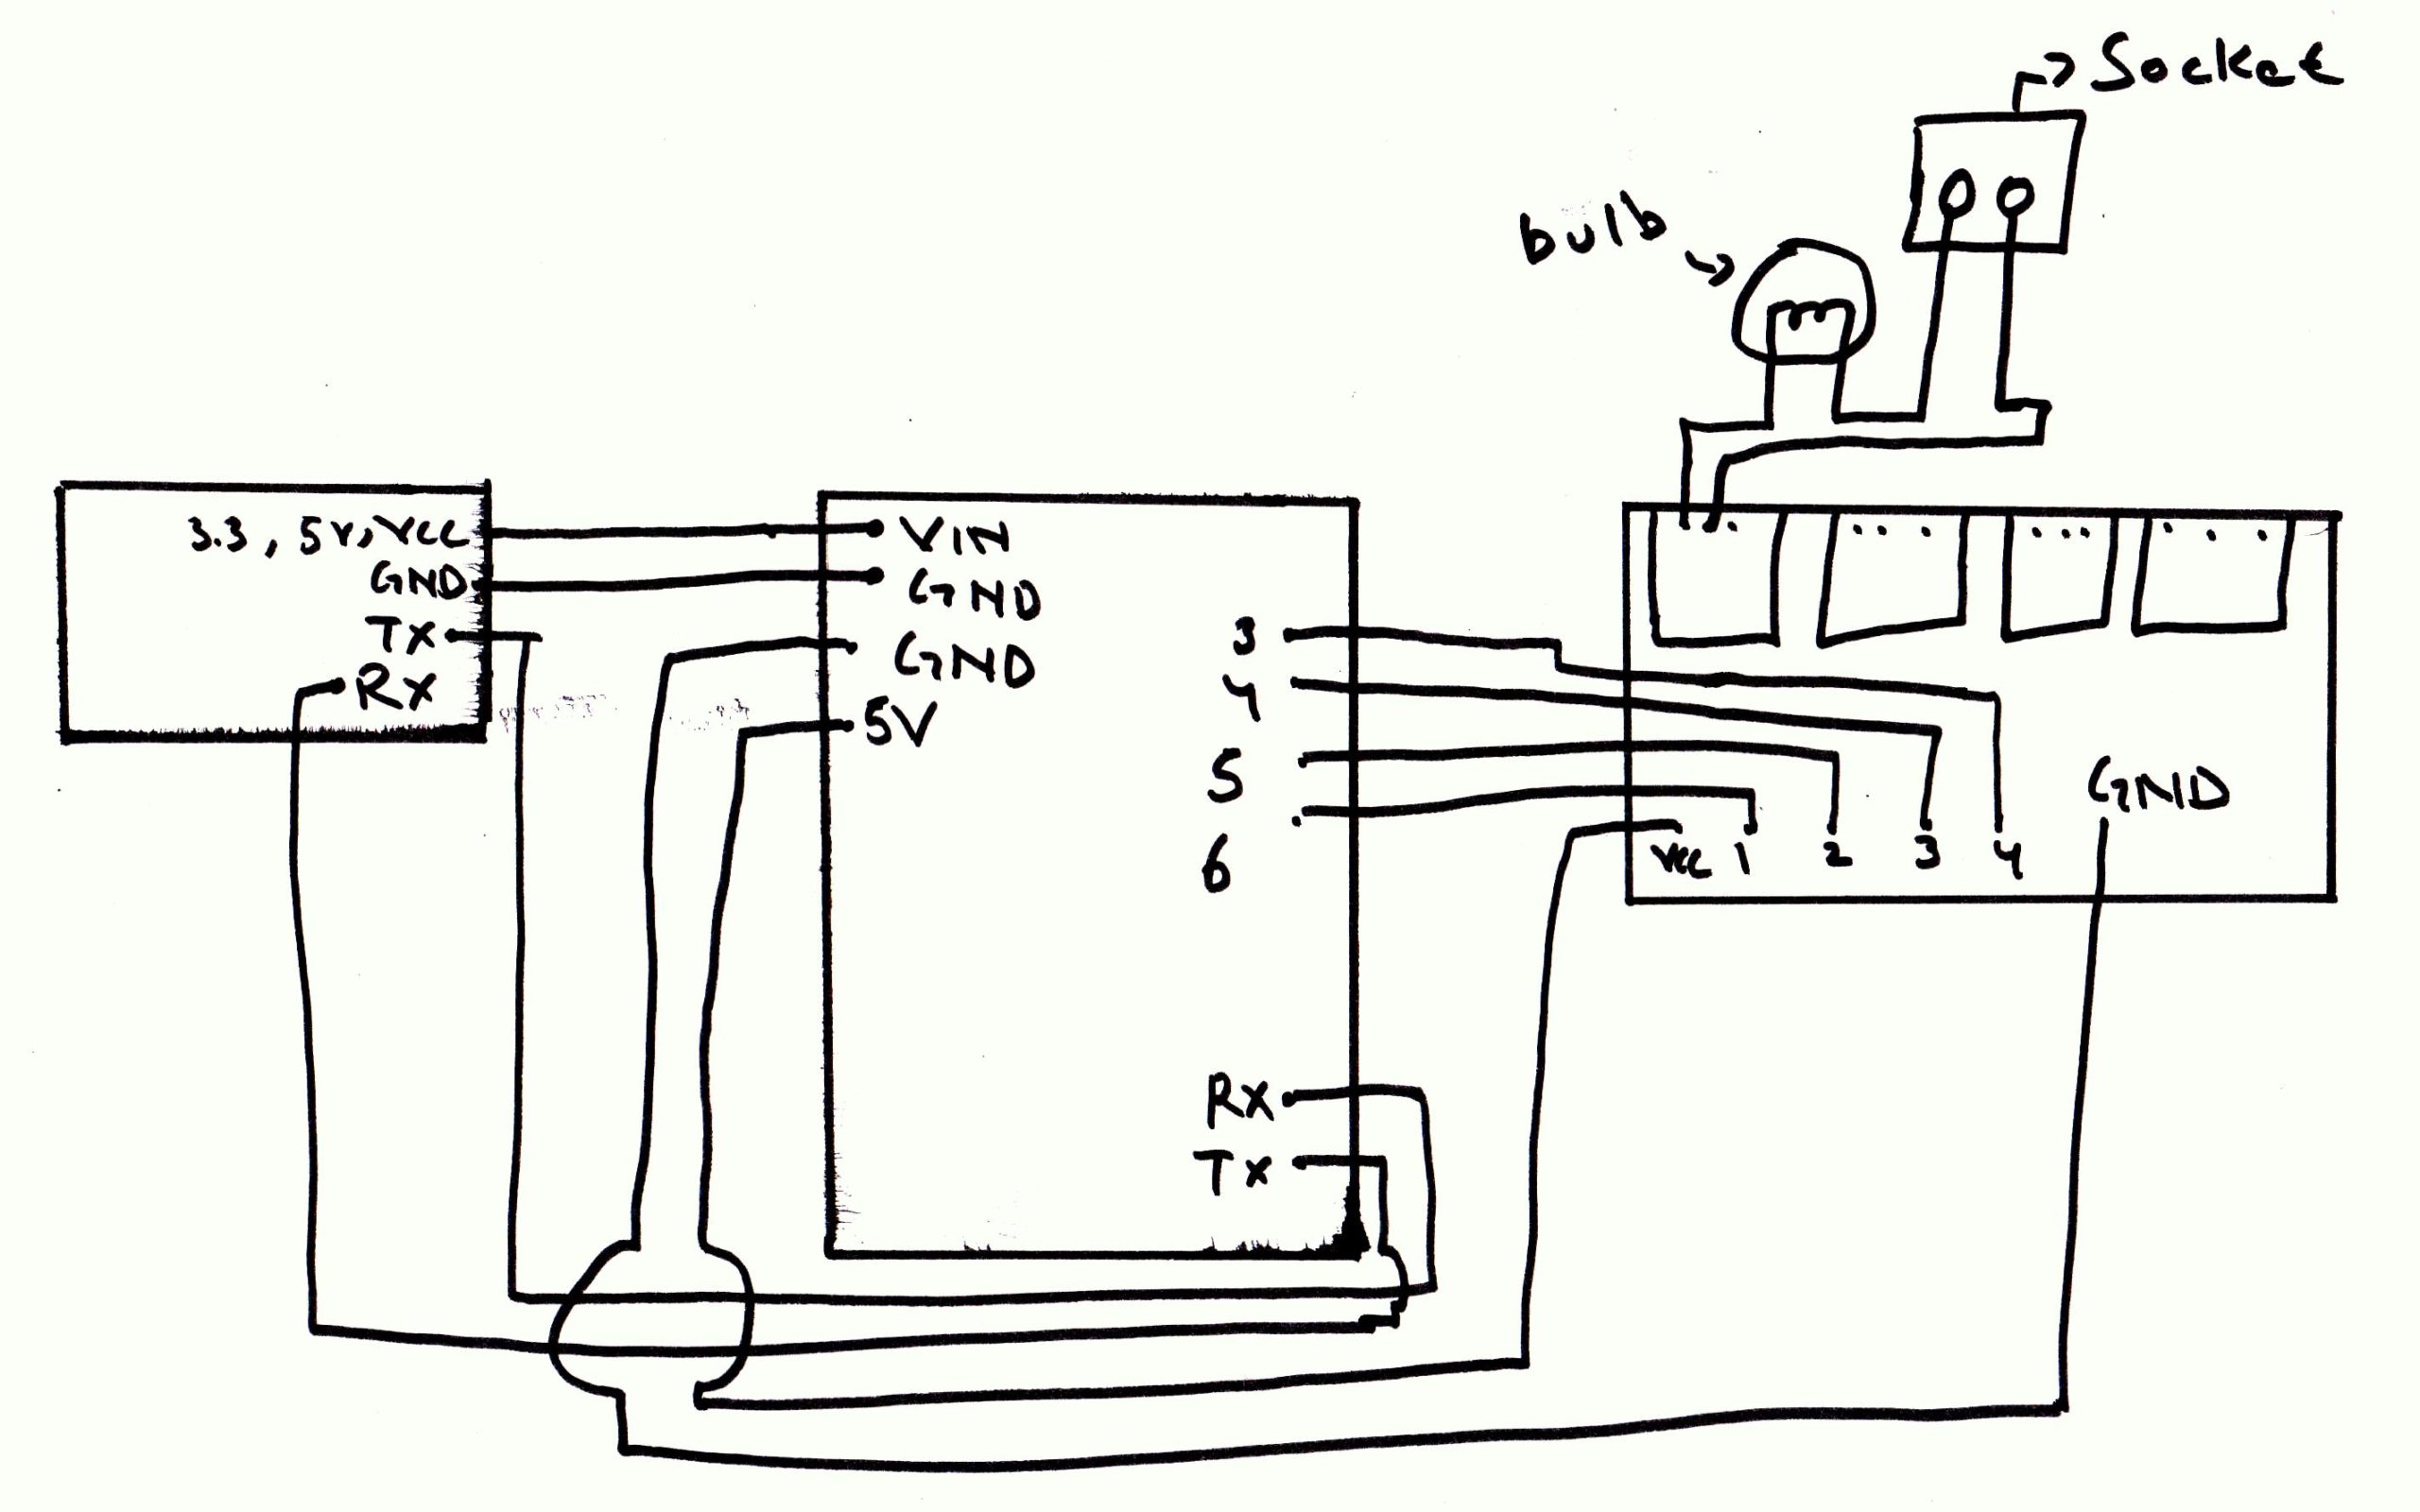
How to connect the relay module to the Arduino:
2) Power the HC-05 module by connecting the 5V and GND pins to the bus strips on the breadboard. Finally, in the void loop, we check for commands from the Bluetooth serial and turn on and off the lights accordingly. BTserial object, you would have to mention the order of the Tx and Rx pins as connected in the Arduino.
Due to that issue I will switch on the camera through my phone or pc. That’s enough current for a lot of devices but not enough for high power appliances like a heater or dryer. For high power appliances you’ll likely need about twice the current capacity (~ 20 amps).
Here is a Simple DIY Home Automation System Code, you can copy the code and paste it in your Arduino IDE. But before that, you need to add Blynk Library to Arduino IDE. Finally, you can use nodemcu to create a home automation system that is completely customised to your needs. Maker.pro needs to review the security of your connection before proceeding. Here is a link for a small solid state relay package that is offered in 2,4, or 8 channels. 2) Next, it will list all the available devices in your vicinity. You can either upgrade to a higher current relay, or place multiple relays in parallel.
We are showing voice control home automation system to control appliances with own voice command an Android app IoTBoys. Build one yourself by following this step by step guide and control your home. Yes, we often update all our eBooks, so everyone who purchases gets free lifetime updates. You’ll also have access to future content that we might add to the eBook.
If you don’t have a Raspberry Pi, you can install all those on a cloud Linux server, for example. We provide installation instructions if you want to use Digital Ocean . If you can’t get a Raspberry Pi, you can still follow along and build your home automation system on the cloud, which requires a monthly payment for the hosting service. Eventually I'd like a hardwired relay, but for now I'll be using the safer option of radio-controlled switches. Before we begin, here's a demo video from the project creator himself.


No comments:
Post a Comment